Entries Tagged 'Modern Furniture' ↓
July 11th, 2010 — Furniture, Modern Furniture
Materials: Ikea Bomull bedspread
Description: I needed FIVE panels (big and small) of roman blinds for my bedroom, and those upscale textured and nice upholstery fabrics are out of my current budget set for window dressing…so I remembered my favourite unbleached cotton from Ikea….the BOMULL bedspread! With the perfect width and length, these fit into my budget perfectly.
After one whole day of sewing, it’s my 1st attempt at roman blinds by the way, thus I am not familiar with it..much…..
I have 3 small windows and 1 extra wide extra large window dressed in zen….
I even had some extrasss….not much, but enough to make a twirly skirt for my 4.5 year old 
See more of Joey’s Bomull roman blinds.
~ Joey, Malaysia


July 11th, 2010 — Furniture, Modern Furniture
Materials: IKEA’s stool, acrylic paint, silver ink
Description:
1. buy stool
2. paint it by black acrylic paint
3. process sandpaper on the edges stools
4. paint the picture by the silver ink
5. covered with polyurethane varnish
that’s all!!!
~ Ataka, Russia


July 11th, 2010 — Furniture, Modern Furniture
Materials: 2 Expedit 2×4 Bookcases, 1 VIKA KAJ leg, 1 Lack shelf, 4 Capita legs
Description: When I first moved two years ago I purchased an Expedit 2×4 Bookcase and laid it on its side against my main wall because I liked that look. I had a Lack shelf of the same color from a previous apartment, so to add some storage I attached some Capita legs from the clearance section onto that and made a little top shelf.
Later on, I wanted more desk space and a well-coordinated living room/office, so I got an identical Expedit case, cut 45-degree angles at the ends of both long pieces, and put together an Expedit-based desk. A VIKA KAJ leg at the wall-facing corner keeps everything stable.
If you wish to pull off a similar hack, take plenty of time to measure the 45-degreee cuts, paint the interior connector pieces (you cram those into the honeycombed paper inside the cut shelves for stability and to connect it) before assembling the finished product. Also, measure the VIKA leg, as the desk will have to settle into place if put on carpet.
Altogether, I’m happy with the way this area looks, and even happier with the tons of workspace it affords me. The whiteboards on the walls are a big bonus, too. Just get some melamine panels at your local hardware store and anchor to suit.
See more photos of the Expedit desk.
~ Brad Czerniak, Canton, MI


July 11th, 2010 — Furniture, Modern Furniture
Materials: Jonas Secretary
Description: I wanted a cat cabinet to hold both the cat food and cat litter. I wanted the cat litter to be high enough so I wouldn’t have to bend over to clean it. I also wanted the cabinet to serve as a dark hiding space for my cats (they like to get away from the dogs every now and then). After being inspired by many of the Ikea hacks on this site, I took a trip to Ikea and found the Jonas Secretary.
I put the cabinet together using the Ikea directions and then proceeded to hack the product in the following way:
1. I decided the top “computer station” was the perfect place to put the litter, as I could easily slide it out onto the pull down door. I cut a hole on the bottom right hand side using an electric jigsaw. The original hole was not big enough for my fat cat  so I ended up cutting almost 1/3 of the shelf away. This allows my cats to drop from the top section of the cabinet into the top drawer.
2. I made an identical cut on the bottom left hand side of the top drawer, creating an opening into the middle drawer.
3. I cut an entry hole (about 5×7 inches) level with the second drawer. I nailed a picture frame I found for $3 at Target to the opening. Now the cats are able to climb into the second food drawer, up to the third napping drawer and then into the litter cabinet at the top.
4. Considering how heavy my cats are, I reinforced the two middle drawers by screwing two pieces of plywood (1/2 x 2 x 16 and 13/16 inches each) under each drawer to help support the bottom.
5. I used clear adhesive shelf liner in the litter cabinet area (along with some sealant) to help with cleanup.
6. Originally, I was just going to place the food dishes in the second shelf, but the space ended up being smaller than I thought. My current food dishes are metal with circular lips. I decided to cut circles out of the bottom of the second drawer to hold each dish.
7. I never liked the handles that came with the cabinet, so I just never put them on. I also thought the cabinet was too dark, so I affixed a mirror I bought at Ikea to the front door. This process was a little more intense than I originally thought, since the door is actually hollow. I cut the mirror to size, then GLUED and screwed the holders into place.
Overall, I’m really pleased with the outcome. Now I just hope my cats like it as well!
~ Teresa, Austin, TX


July 11th, 2010 — Furniture, Modern Furniture
Materials: Skala Tray
Description: I liked the design of the tray, but I thought it was a little boring and I didn’t think the finish was very durable. I often eat at the coffee table especially when Glenn is gone so I thought a tray would be useful for carrying my dinner and glass of wine.
We have an entire drawer full of travel brochures, maps, tickets stubs and all sorts of Japanese memorabilia since we’ve lived here for 18 months. I thought it would be fun to use all of this to dress up the plain tray.
I used Modge Podge to glue down the paper scraps and then 5 coats of the Podge on top. Waiting for it to dry between each layer. I had high gloss Modge Podge so it has a glossy finish. I hope we have it for a long time and it reminds us of our time here.
See more of Kelly’s Japanese Skala tray.
~ Kelly, NAF Atsugi, Japan


July 11th, 2010 — Furniture, Modern Furniture
Materials: VASTLIG
Description: This works best with younger plants, though I have transplanted full size plants into this upside-down configuration without too much problem.
Tools: Scissors, plant, dirt, boxboard or cereal box-type material-(you can use felt too.) A pole for hanging your plant.
1. Look at your plant and decide if you want to push the roots up through the bottom or if you want to push the plant down through the bottom.
2. Get you VASTLIG bag and cut a X on the bottom. It should be as wide as the branching leaves on your plant or the root ball. You don’t want to make this too big or the plant will fall out. But you can make your X smaller in the next step.
3. Cut the boxboard or felt to fit the bottom of the bag- it doesn’t have to fit exactly, but it must be a few inches bigger than the X. This is a collar.
4. Cut collar from the edge of the boxboard or felt to the center, and when you get to the center, cut a circle shape. Set this aside.
5. Now put your plant through, then grab your collar and nestle it down into the bag so it holds the roots and keeps them from falling out of the X.
6. Add dirt and water and you are done.
P.S. Ikea for City Gardening!
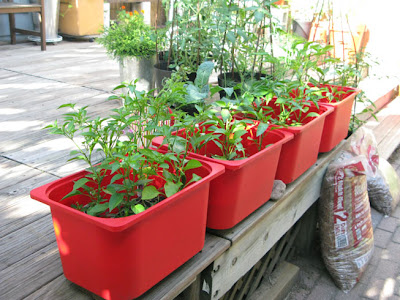
By looking at Ikea items in a different perspective, I have used them for my city garden.
VASTLIG- bag as upside-down planter
FNISS-waste basket as deep root planter
EVERT- as deep root planter
SMYCKA- tied together as plant supports
TROFAST- as shallow root planter
~ Ninjarita, Minneapolis


July 11th, 2010 — Furniture, Modern Furniture
Materials: Numerar Worktop (246 x 62cm) / Vika Kaj Adjustable Leg
Description: Me and my girlfriend needed a new desk. A large one. So that we could work at it together. Inspired by this post, we decided to go for a Numerar worktop (length 246cm). We thought it would look best to use as few legs as possible so we mounted some wooden beams we had left to our wall for the worktop to lay on. On the one side where there is no wall we attached a Vika Kaj adjustable leg to the worktop. The result is surprisingly stable!
For some unknown reason our walls are not 100% straight. This allows for some neat cable management as can be seen on the pictures.
Hope you like it.
~ Oscar, The Netherlands


July 11th, 2010 — Furniture, Modern Furniture
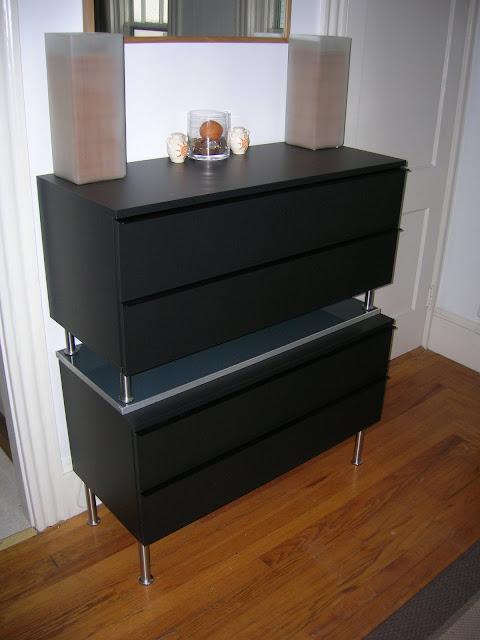
Materials: Ãnga two compartment cabinet, Capita legs, Rubrik cabinet door
Description: My roommate and I were looking for something to use as a sideboard in a space in our dining room, and obviously wanted to go the Ikea route to flow with the rest of our apartment, but were having some troubles. We wanted something that would provide lots of storage but wouldn’t be too big depth-wise.
While perusing the As-Is section, we happened upon two identical, brand new condition Ãnga pieces. They were already assembled, but we determined they were brand new because they still had the protective film on the surfaces. Originally these cabinets are $120 each, but we found them for $40 each.
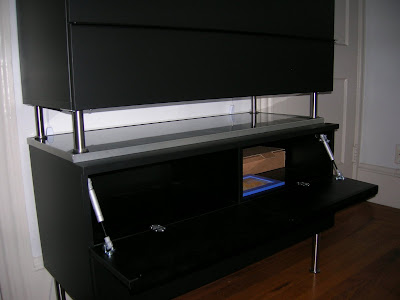
Since our apartment building is an older building, we didn’t think that the walls would be capable of supporting the rails necessary for the actual Ãnga system, so we opted to make a free-standing unit, and bought a set of the 8″ Capita legs… seemingly the simplest go-to pieces for hacking something that you want elevated a bit.
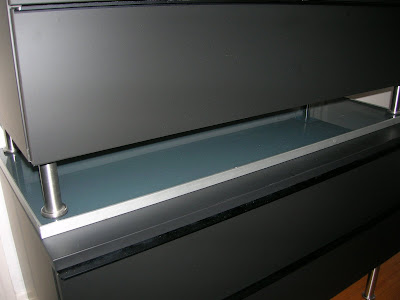
We weren’t really interested in the standard look of 4 straight doors, which would look like a dresser so we purchased a set of the 4″ Capita legs in the As-Is department for a couple of dollars as well. I had a grey-blue Rubrik cabinet door from an old hack I did, which fit perfectly on top of one of the cabinets, upon which we put the other cabinet. Having the Rubrik door in between the two pieces gives it a little differentiation, a subtle addition of colour and with the metal edge, ends up tying them together as well.
Even though this is just a simple “add Capita legs to something” hack, we took pieces that are meant to be mounted in a different fashion, and used them for a different purpose as a dining room sideboard cabinet, rather than an entertainment centre on the rails they were intended for.
~ Steve L., Providence, RI


July 11th, 2010 — Furniture, Modern Furniture
Materials: 1 $1.99 Ikea wood cutting board, 8 galvanized 1 1/2″ Grabber screws, table saw, drill and countersink, drill/driver, wood putty, Workmate 400 workbench , carpenter’s wood glue
Description: I’ve been using our bread machine a lot recently, and wanted a miter box to help me cut thinner, more consistent slices. The $1.99 Ikea cutting board I’d been using for a couple of years was warping, so was fair game for cutting up to make such a device.
Using the remnant of the last loaf I had baked as a template, I took measurements and laid out cut lines on the soon-to-be-ex-cutting board. I designed it so the front panel extends down a half inch below the front lip of the countertop – the so-called bench hook effect, so the whole contraption doesn’t slip around while you are sawing your rustic loaf.
A miter box could hardly be simpler, consisting as it does of only three pieces – front, back, and bottom. This box, designed around the loaf that comes out of a Breadman bread machine, wastes only a 3/4 -inch crosswise strip from the Ikea cutting board.
I held the bottom panel vertically in the Workmate vise, and aligned the front panel horizontally on top of it, countersinking one hole at a time, then fastening them temporarily with a screw.
The reason to drill and fasten one screw at a time is because the bottom panel had a curve in it, due to the previous warping of the cutting board, and I was able to straighten it out by bending it straight with my hands until the screws could take the tension. When all the screws were fitted, I disassembled it, applied glue to the two joints, and reassembled it.
I marked vertical cut lines on the front and back panels and cut the slots with a large hand saw. In retrospect, this is not really accurate enough, and next time I’ll do this job on the table saw while the parts are disassembled. Since I’m right-handed, the cut slot is near the right side of the box.
I filled the screw holes with wood putty, waited for it to dry, and sanded the plugs flush. Then I sanded off all the various pencil marks and knocked down the fresh cut edges a little to avoid sliver hazards. Finally, I applied Ikea Skydd, food-grade mineral oil for conditioning cutting boards.
~ Mark Ungar, Richmond, CA


July 11th, 2010 — Furniture, Modern Furniture
Materials: Fastbo Panels, Ikea Stainless Doors, Numerar Countertop
Description: We repurposed an existing vanity (builders beige) by removing the doors, then affixing the Fastbo panels to suit the Ikea standard kitchen cabinet stainless doors (not alot of work) – (sorry don’t have the Ikea name of the stainless doors- they have a copper now but I havent seen the stainless in doors in a while.)
We then used Ikea butchers block NUMERAR countertop, stained it in ebony minwax stain and varnished with 5 coats polyurethane in high gloss.
Then added square sinks from Rona and faucets as well.
~ Colette Lepine-www.homedesignworx.com, Ottawa, Ontario Canada


![]()


