Entries Tagged 'Modern Furniture' ↓
July 11th, 2010 — Furniture, Modern Furniture
Materials: Besta Shelf Unit, Besta Suspension Rail, Inreda Ladder, self-drilling heavy-duty Nylon wall anchors, multi-position extension ladder
Description:
Problem
For the longest time I’ve been meaning to make use of the over head space in the stairwell of our home. With 1100 square foot of living area, space is at a premium. We keep all our books in the home office, but we don’t have enough shelf space on our bookshelves.
Solution
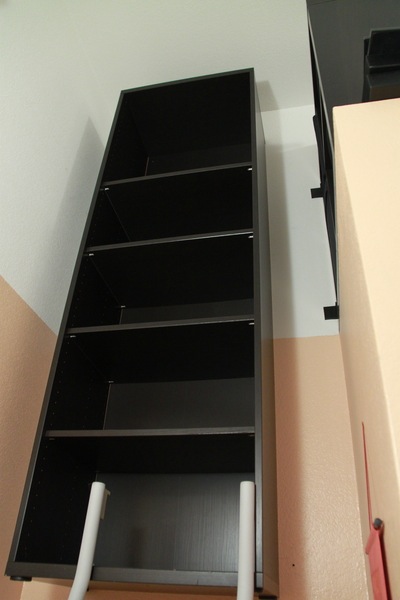
I decided to suspend a bookshelf in the over head space in the stairwell. The stairwell is high enough to fit a full height bookshelf without encroaching on the head space in the stair well.
We decided on a full height Besta Shelf Unit to accommodate some of our books, paperwork and other things.
Next on the shopping list was the Besta Suspension Rail. It is made of aluminum and features 20 drill holes for securing it to a wall.
To get to the top part of the shelf unit we need a ladder. Ikea sells the Inreda Ladder which fits the Besta Shelf Unit.
Preparation
The instructions for the Besta Suspension Rail only depict a height extension unit. There were no load numbers in the instructions or on the website so I estimated load bearing based on prior experience. Normally, the rail is fastened to the wall with a couple of screws. Since it is supposed to suspend a full height shelf unit I doubled that and used self-drilling heavy-duty Nylon drywall anchors to hold the rail in place.
Installation
To get to the top of the over head space I used a multi-position ladder (like the Little Giant brand) fully extended. First I took measurements according to the instructions that came with the suspension rail.
Then I fastened the rail to the wall with the self-drilling drywall anchors. Next I hung the assembled Besta Shelf Unit onto the Besta Suspension Rail. This required getting on the multi-position ladder half-extended on one side to sit on a higher step and fully extended on the other to sit on a lower step in the stairwell.
Getting the shelf unit up to the suspension rail required some heavy lifting for which I recommend at least two people. Once suspended from the suspension rail I fastened the shelf unit to the suspension rail per the instructions using the supplied screws.
Since the shelf unit is quite tall, its bottom part can still be lifted away from the wall. I used the additional plastic distancers that came with the suspension rail to fasten the bottom left and right corners to the wall using the supplied additional screws.
After a quick load test I used the Inreda ladder to get up high enough to replace the shelves inside the bookshelf and made sure I could reach all shelves all the way to the top.
Final Result
We now have an additional full height bookshelf for items we don’t need to access on a daily basis in a space in our home that wasn’t used before.
I plan on securing the Inreda ladder with a couple of simple wall hooks to the left of the bookshelf so it is out of the way yet easily accessible when needed.
~ Dierk Seeburg, Arizona


May 6th, 2010 — Furniture, Modern Furniture
 Firstly I want to thank you for your feedback and help when I asked for it. In many ways, your comments gave me a clearer view of how to improve Ikeahacker as well as chart a direction for it. Thank you, thank you! I feel re-inspired.
In response to that (I wouldn’t want you to think that I wasn’t listening!) I have made a few tweaks to the current site. Mind you, this is not the big redesign I was talking about (which I am now seriously considering Wordpress. Any thoughts?). I don’t want to do too much on this template since I won’t be using it in the redesign. But I do want to make sure that your experience on this site, while I work on the new design for the next coupla months, is a lot more useful and friendly. So here goes:
Many of you asked for:
1. Better navigation
- I’ve added the “older” and “newer” posts links at the bottom of the page. Hope that takes away the frustration of browsing the archives.
- Related posts complete with thumbnails are now under each post.
May 6th, 2010 — Furniture, Modern Furniture
Materials: Kassett
Description: I cut the handle opening to a larger size to accommodate the cords and cables and allow for more ventilation.
Place everything in the box, close lid.
Here is a picture of the before mess and the after.
After
See more of Mel’s quick clutter buster.
~ Mel, Mississauga, Ontario


May 6th, 2010 — Furniture, Modern Furniture
Materials: STENSTORP kitchen island NOK 3.250,-, 4 wheels ca. NOK 1200,-, drill, hammer
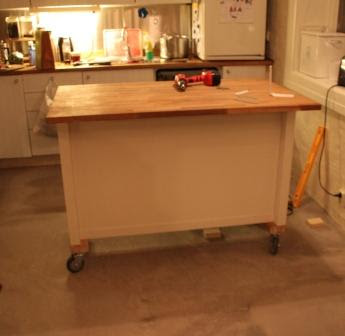
Description: A couple of years ago I bought a STENSTORP kitchen island. Because we have little space, I wanted to have put wheels on it for more flexibility. We did the makeover this winter and it works so well!
My sister is a handy woman and did most of the work. I took pictures, and chopped of the legs, actually sawed them!
The item has shelves on one side (now called backside). On the reverse side there is an open space so you can use it as a bar, with stools (now called front side). The two parts are divided by a wall, which serves as the back of the shelves.
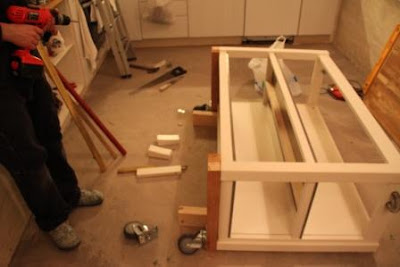
First we took the top of the kitchen island.
Then we sawed of the horizontal planks that are holding the front side legs. Then we shortened all legs.
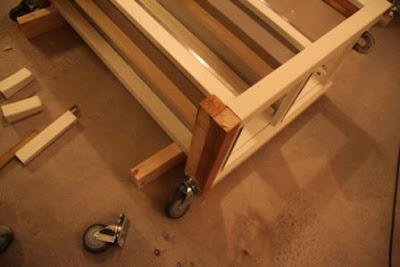
We took the legs from the front side and fasten it to the vertical plank that is holding the wall.
Then we took horizontal planks and fasten it under the legs, and fasten the wheels in them.
In the end we put the top back on!!!
Voila! And good luck!
~ hildeovedia, Oslo, Norway


May 6th, 2010 — Furniture, Modern Furniture
Materials: Regolit, Januari
Description: I was always a big fan of the simplicity of the Regolit lamp, so I’ve designed a very basic and clear lamp. It’s a combination of the pendant lamp Regolit and the table lamp base Januari fixed with cable clips. The result is this smart Bauhaus inspired lamp.
~ Daniel, Stuttgart, Germany


May 6th, 2010 — Furniture, Modern Furniture
Materials: Doors Billy Morebo, Ikea textile, glue gun, scissors
Description: During renovation of our toilet we decided not to use standard sanitary door and purchased two doors Billy Morebo from Ikea.We decorated them with Ikea textile and added several pictures with the same textile on walls.
More pictures of result and process see on our site prohandmade.ru. Enjoy!
~ Ekaterina, Moscow, Russia


May 6th, 2010 — Furniture, Modern Furniture
Materials: DUDERO, black paper, a fake mustache, white chalk, scissors and a knife.
Description: We bought the DUDERO – but we found it too plain and boring. So after pasting on a fake mustache, which made it look like Freddy Mercury, we decided to make the lamp into a pirate. See the result!
~ Rowan Zajkowski, Raamsdonksveer, The Netherlands


May 6th, 2010 — Furniture, Modern Furniture
Materials: PERFEKT Storage System
Description: Vino anyone? I love wine, but often had no place to store several bottles (My kitchen is about 90 sq ft). I used a portion of the Perfekt storage system to create a cute little wine cabinet in my kitchen. I removed the drywall and portions of 2 X 4s in the foyer to create a niche for the shelving system. I added supports on either side for a tight fit, then added molding on the outer edges for a finished look. Now I can store up to 10 bottles at a time!
~ Kim B, Jacksonville, FL


May 6th, 2010 — Furniture, Modern Furniture
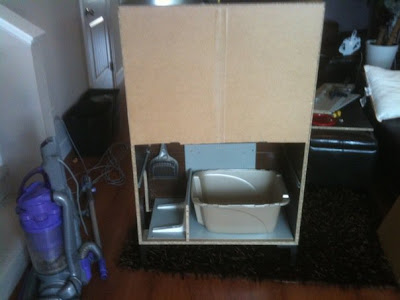
Materials: Engan 2 drawer 2 door, catbox, motion sensitive light
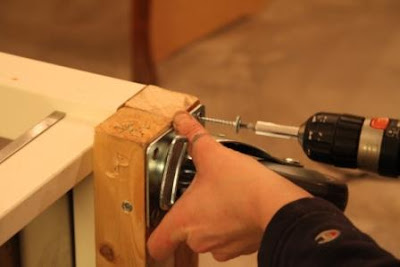
Description: I followed the basic instructions but skipped the part about the drawers instead opting to use one of the side panels from a drawer to join the two drawer fronts together. Once attached using the 2 provided L bracket that were supplied + 1 other larger one I had bought at Ikea as well I mounted the drawer fronts to the unit.
With all parts together I put the back on but only nailed the top part down to the middle then used a jig saw to trim off the bottom half, then jigged out the cat door oh so very carefully.
The entry hole is protected around the edges with Ikea cable tube held on with the remaining nails from the backing. The bottom where the box is sitting on is one of the drawer bottoms.
Last steps were to add in a motion sensitive light and I added 2 more L brackets with another drawer side to act as a brace so the box won’t shift when in use. The concern was the cat could potentially trap himself in side.
~ mcquarris


May 6th, 2010 — Furniture, Modern Furniture
Materials: Bolmen Garbage Can, Blanken Corner Wall Shelf, Deka Curtain Wire w/ Clips, Ikea Knob from Dresser, Grundtal Rail Ends & Rationell Variera plastic rail guide.
Description: So when we moved to our new home I encountered a problem that I couldn’t find a garbage can that would fit under my sink, there wasn’t an auto open can small enough that could clear the pipes and such.
I bought the Bolmen garbage can as a temporary measure until I found something better. But one day, with a flash of brilliance, I combined it with host of other items I had and made exactly what I wanted.
The Grundtal Rail ends supply bottom support for the Blanken corner wall shelf to mount to with zip ties I had left over from some Ikea cord tubing I had bought.
The can itself is held in place using a Rationell Variera rail guide that was an extra we got in a package, the groove of the can fits nicely into the groove of the guide.
Lastly I used some spare Deka curtain wire minus the clips that was used for an art installation and fixed one end to the counter the other to the lid with just enough slack so when the door is opened the lid opens up.
I used a knob from an old Ikea dresser we had to attach to the other end of the Deka on the underside of the lid to provide a bit of weight to assist the lid return when the door closes.
Lastly I attached the can to the corner wallshelf with some screws, because sometimes when near empty the can would sometimes pop out and fall over.
Sounds like a lot eh? It was actually pretty easy.
~ mcquarris


