Entries Tagged 'Modern Furniture' ↓
Gallery: Deadstock Collection by Castor Design
January 30th, 2012 — Furniture, Modern Furniture
Not so boring Christmas wreath
December 26th, 2010 — Furniture, Modern Furniture
Materials: Ikea SNÖVITA wreath, felt, scissors, glue
Description: I personalized the SNÖVITA wreath using stash of felt I had at home.
I made one with Saint Nicolausand another one with the 3 magic kings (a spanish tradition, on the 6th of January they come to every house and leave gifts and stuff).
It was a nice easy way to get a different Christmas wreath for less than 30$!
See more of the Christmas wreaths.
~ Julia, Zurich/Barcelona
Coat hanger shelf
December 26th, 2010 — Furniture, Modern Furniture
Materials: EKBY BJÄRNUM brackets (28 cm), EKBY TONY shelf, ATTEST handle (hole spacing 224 mm), 2 new screws – must be a bit longer than the ones included with the handle
Description: This one is pretty easy. The hacky part is using a door handle as the coat hanger rack.
Buy two new screws from your local hardware store (bring the screws included with the handle so you know what to look for). The new screws must be a little bit longer, try measuring the included screws up against the shelfs thickness.
Cut the shelf to the desired length.
Use a tape measure find the center of the shelf and mark two spots (224 mm apart) where you should drill. Ikea also sells templates to help you mark the two spots with the correct distance, if you are at not completely comfortable with this part.
Double check your measurements, you only get one chance so get it right.
Drill!
Simply follow the included instructions to mount one of the door handles on the shelf, like you would on a wardrobe door.
~ Carsten Elton Sørensen, Copenhagen, Denmark
Modern couch
December 26th, 2010 — Furniture, Modern Furniture
Materials: LACK tv unit, KLUBBO coffee table leg, cushion material, fabric, screws, wood pieces, L shape brackets
Description:
1. Arms:
Use wood glue to secure two pieces of 4X6X21.5 and one 2X4X21.5 together for the creation of the arms. Sand edges then place thin layer of foam filler to soften the top and surroundings of the arms. Lastly upholster both arms.
2. Base:
Take apart LACK TV unit and use the top for the base of the couch where you will be sitting. Secure both arms to the LACK unit. Then place it on top of the KLUBBO coffee table legs and secure.
3. Back:
To upholster you need to find the shape of where the arms and cushions will be and exclude it. Staple fabric down and fill cushion material for the upper half of the back. (The entire back will not be cushioned because it will be pushed against the arms and seat cushions … so avoid that portion when upholstering).
You can also create a tufted look by stapling down the areas you want and placing buttons there.
4. Securing:
Place back and secure it to the base with screws. I recommend to use L shape brackets found at Home Depot for a more stable result.
5. Cushions:
I used two 4X22X24 inch foam for the seat cushions found at thrift store, but you can use any material you like for this portion and just upholster it. I believe you can find this type of thick foam at crafts stores.
6. Lastly make some pillows to go with it and enjoy ![]()
~ Ayako Nakamine (Micci Do), Salt Lake CIty Utah
Refitting an attic room – storage and room divider
December 26th, 2010 — Furniture, Modern Furniture
Materials: Pax and Bergsbo
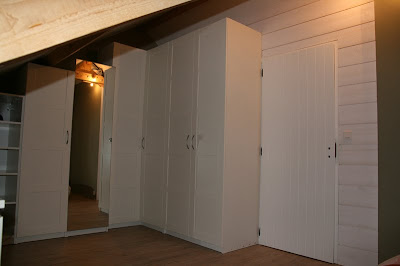
Description: Objectives : designing and planning our attic room with storage (many for Mrs !) and a little office zone.
Initial situation : 25 sq metres without any divider and without any storage
IKEA Materials :
-2 Pax wardrobes in 100 x 240 cm
-1 pax Add-on corner unit (240 cm)
-3 Pax wardrobes in 50 x 192 cm
-5 Bergsbo doors
-1 mirror door
Other materials
-A door
-milled panels
-insulation plates (wool and hemp)
-many battens
Steps
1. Assembling and fixing against the wall the 2 huge Pax wardrobes and the Pax Add-on corner without forgetting technical shaft (phone, electricity and ethernet)
2. Fixing battens on the back of pax wardrobes vertically and up to the ceiling
3. Fixing the door with battens
4. Mounting the wall with milled panels without forgetting to put insulation plates between battens
5. Finishing the wall with milled panels
6. Reshaping of the 3 192 cm pax wardrobes to fit under the roof and fixing against the wall
7. Reshaping Bergsbo doors and fixing
Here we are ….. many many storage and a really nice and insulated divider !
~ Madotter, Paris region
How to make a crystal chandelier
December 26th, 2010 — Furniture, Modern Furniture
Materials: IKEA TIDIG light, Binder Rings, Keychain Rings, 3-4 Candle Holders from Hobby Lobby or any other Crystal hangings that you can find – I also used Crystal Christmas tree ornaments shaped like hearts, Hooks (to attach the power cord to the wall if you did not have a separate light to hook the TIDIG up to)
Description:
Cost: Around $200 – sounds pricey but it really isn’t when you consider that the same could be found for $799 at Lamps Plus. Then I found this on your blog.
I wanted to make it but unfortunately Ikea doesn’t sell the GLIMT anymore; at least in my area here in AZ. So I went to Ikea and found the 6-light TIDIG hanging ceiling light that comes with 6 frosted white lamp shades on each of the mini lights. This one looks much lengthier than the GLIMT from what I can tell in the picture, and it was the same price! The one I got isn’t on their website, but I got
it in the store and they had 2 different sizes if you’d prefer the smaller version instead like the GLIMT.
To get the crystal Chandelier hangings, I actually went to Hobby Lobby and bought candle holders (They were 23.99 each, but I got them for 50% off because they are almost always having a sale on candle holders).
I removed all the crystal hangings from the candle holder. Then I regifted the candle holders without the crystals to different people for Christmas – it looks very modern without the crystals and people were telling me how cute they looked (not knowing they were missing the crystals).
Then I had my dad install the light into our loft window opening. He also attached a power cord because unless you have another light that you removed to hook this up to, you will need to attach it to a power cord. He then used 2 hooks and attached them in the corners of the windows to keep the white cord from hanging in the way.
Once it was hung up, my friend and I attached the rhinestone hangings using keychain and binder rings.
Hemnes dresser revamp
December 26th, 2010 — Furniture, Modern Furniture
Materials: Hemnes
Description: Just recently I painted the eight drawer Hemnes dresser for my boys room, check it out here.
~ Kate
Pretty shoe rack
December 26th, 2010 — Furniture, Modern Furniture
Materials: TROLLSTA
Description: Djinny tips me on this hack. (thanks!)
An Ikea shelf (not sure of its name) shod with Trollsta legs for a pretty shoe rack.
See more of the shoe rack.
Jokkmokk angled vanity
December 26th, 2010 — Furniture, Modern Furniture
Materials: Jokkmokk
Description: We took my old Jokkmook table and used it as the vanity in our new bathroom. The table was about 6 years old. We sold off the old chair and cut the table so it would fit in the angled corner. The sink is from Overstock.com.
Here’s a link to the installation.
~ Catherine
Funky Pax room divider
December 26th, 2010 — Furniture, Modern Furniture
Materials: Pax
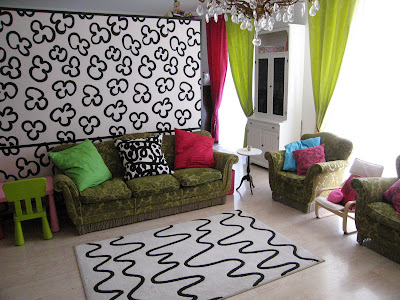
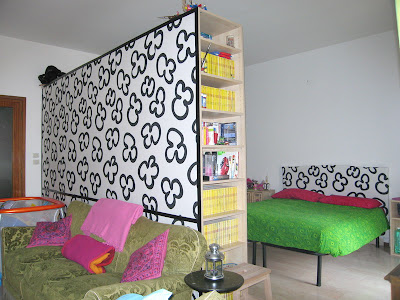
Description: I’m glad to show you my ikea hack! Mine it’s a 42sqm room that I had to divide into a day and night zone without building any wall!
I decided to buy a huge Pax wardrobe and put it in the center of my room! I assembled a Pax component with a 90degrees rotation and left it without door: now it’s my bookshelf!
Then I bought an Ikea cloth to cover the wardrobe back and my old grandparents wooden bedhead.
~ Elisa, Rome, Italy.


